DiscoveryBot (talk | contribs) No edit summary |
DiscoveryBot (talk | contribs) No edit summary |
||
| (4 intermediate revisions by the same user not shown) | |||
| Line 1: | Line 1: | ||
__NOTOC__ | __NOTOC__ | ||
<table class="infobox bordered" style="float: right; margin-left: 1em; margin-bottom: 10px | <table class="infobox bordered" style="float: right; margin-left: 1em; margin-bottom: 10px; font-size: 11px; line-height: 14px; border: 1px solid white;" cellpadding="3"> | ||
<td colspan="2" style="text-align: center; font-size: | <td colspan="2" style="text-align: center; font-size: 16px; line-height: 18px; background: rgba(255, 255, 255, 0.2); color: #ffffff" title=iw01><b>Bering</b> | ||
</td></tr> | </td></tr> | ||
<tr> | <tr> | ||
<td colspan="2" style="text-align: center; border: 1px solid | <td colspan="2" style="text-align: center; border: 1px solid white;"><div class="center"><div class="floatnone">[[File:iw01.png|center|250px]]</div></div> | ||
</td></tr> | </td></tr> | ||
<tr> | <tr> | ||
<td colspan="2" style="text-align: center; font-size: 14px; line-height: 18px; background: | <td colspan="2" style="text-align: center; font-size: 14px; line-height: 18px; background: rgba(255, 255, 255, 0.2); color: #ffffff">System | ||
</td></tr> | </td></tr> | ||
<tr> | <tr> | ||
| Line 26: | Line 26: | ||
<td class="infobox-data-title"><b>Connected Systems</b> | <td class="infobox-data-title"><b>Connected Systems</b> | ||
</td> | </td> | ||
<td style="padding-right: 1em">[[Texas]]<br/>[[Hudson | <td style="padding-right: 1em">[[Texas]]<br/>[[Hudson]]<br/>[[Hamburg]]<br/> | ||
</td></tr> | </td></tr> | ||
| Line 52: | Line 52: | ||
<div style=" font-size: 133%; text-decoration: underline; line-height: 1.5em; padding-top: .5em;">Nebulae & Asteroids</div> | <div style=" font-size: 133%; text-decoration: underline; line-height: 1.5em; padding-top: .5em;">Nebulae & Asteroids</div> | ||
<ul> | <ul> | ||
<li>Anadyr Debris Field</li> | |||
<li>Norton Debris Field</li> | |||
<li>Nunivak Minefield</li> | |||
<li>Pribilof Minefield</li> | |||
<li>Tanner Asteroid Belt</li> | <li>Tanner Asteroid Belt</li> | ||
</ul> | </ul> | ||
| Line 61: | Line 65: | ||
<table class="wikitable sortable"> | <table class="wikitable sortable"> | ||
<tr> | <tr> | ||
<th>Station</th> | <th style="background: rgba(255, 255, 255, 0.2)">Station</th> | ||
<th>Owner</th> | <th style="background: rgba(255, 255, 255, 0.2)">Owner</th> | ||
</tr> | </tr> | ||
<tr> | <tr> | ||
| Line 70: | Line 74: | ||
<tr> | <tr> | ||
<td>[[Bristol Bay Station]]</td> | <td>[[Bristol Bay Station]]</td> | ||
<td>[[Bristol Constructions | <td>[[Bristol Constructions & Manufacturing]]</td> | ||
</tr> | </tr> | ||
<tr> | <tr> | ||
| Line 80: | Line 84: | ||
<li class="mw-empty-elt"></li></ul> | <li class="mw-empty-elt"></li></ul> | ||
<div style=" font-size: 133%; text-decoration: underline; line-height: 1.5em; padding-top: .5em;">Commodity Mining</div> | <div style=" font-size: 133%; text-decoration: underline; line-height: 1.5em; padding-top: .5em;">Commodity Mining</div> | ||
<ul> | <ul><li>Scrap Metal</li> | ||
<li>Scrap Metal</li> | |||
</td> | </td> | ||
| Line 87: | Line 90: | ||
<div style=" font-size: 150%; text-align: center; line-height: 1.5em; border-bottom-width: 1px; border-bottom-color: #AAAAAA; border-bottom-style: solid;">Faction Presence</div> | <div style=" font-size: 150%; text-align: center; line-height: 1.5em; border-bottom-width: 1px; border-bottom-color: #AAAAAA; border-bottom-style: solid;">Faction Presence</div> | ||
<div style=" font-size: 133%; text-decoration: underline; line-height: 1.5em; padding-top: .5em;">Lawful Factions</div> | <div style=" font-size: 133%; text-decoration: underline; line-height: 1.5em; padding-top: .5em;">Lawful Factions</div> | ||
<ul></ul> | <ul><li>Bristol Constructions & Manufacturing</li> | ||
</ul> | |||
<div style=" font-size: 133%; text-decoration: underline; line-height: 1.5em; padding-top: .5em;">Corporations & Guilds</div> | <div style=" font-size: 133%; text-decoration: underline; line-height: 1.5em; padding-top: .5em;">Corporations & Guilds</div> | ||
<ul> | <ul><li>Deep Space Engineering</li> | ||
<li>Deep Space Engineering</li> | |||
</ul> | </ul> | ||
<div style=" font-size: 133%; text-decoration: underline; line-height: 1.5em; padding-top: .5em;">Unlawful Factions</div> | <div style=" font-size: 133%; text-decoration: underline; line-height: 1.5em; padding-top: .5em;">Unlawful Factions</div> | ||
| Line 112: | Line 115: | ||
The Tanner Belt entirely engulfs the Bering system. Despite intensive surveys by both Liberty and Rheinland mining corporations, no mineral deposits of economic value have ever been discovered within the barren rock asteroids of the vast field. Unioners and Xenos have been spotted within the system on a regular basis. <p> | The Tanner Belt entirely engulfs the Bering system. Despite intensive surveys by both Liberty and Rheinland mining corporations, no mineral deposits of economic value have ever been discovered within the barren rock asteroids of the vast field. Unioners and Xenos have been spotted within the system on a regular basis. <p> | ||
<h3>Norton Debris Field</h3> | |||
<b><font color="red">>>>WARNING: NAVIGATIONAL HAZARD<<<<p><p></b></font>The Norton Debris Field initially developed during the Hudson War as a result of battles fought between the Liberty Navy and Rheinland Military around the Hamburg Jump Gate. When the Jump Gate was sabotaged in 819 AS, several Liberty battlegroups were destroyed, greatly contributing to the wreckage. The Liberty Separatists later established their headquarters using the dangerous field as cover, although this did not save them from the Scouring of Bering in 827 AS. Since then, Bristol Construction and Manufacturing have begun salvaging the field, under a contract issued by the Liberty government.<p> | |||
<h3>Anadyr Debris Field</h3> | |||
<b><font color="red">>>>WARNING: NAVIGATIONAL HAZARD<<<<p><p></b></font>The Anadyr Debris Field is the result of battles fought between the Liberty Navy and Rheinland Military during the Hudson War. Leaking reactor cores posed a severe challenge to salvage efforts, with works only recently being initiated by Bristol Construction and Manufacturing under a contract issued by the Liberty and Rheinland governments.<p> | |||
<h3>Pribilof Minefield</h3> | |||
<b><font color="red">>>>WARNING: NAVIGATIONAL HAZARD<<<<p><p></b></font>This minefield was deployed by the Liberty Navy early in the Hudson War, in an attempt to secure one flank against the Rheinland Military's attacks on the Texas Jump Gate. The concealed mines scattered among the asteroids poses a serious navigational hazard to this day.<p> | |||
< | <h3>Nunivak Minefield</h3> | ||
<b><font color="red">>>>WARNING: NAVIGATIONAL HAZARD<<<<p><p></b></font>This minefield was deployed by the Rheinland Military early in the Hudson War, in an attempt to ambush the numerically superior battlegroups of the Liberty Navy. The concealed mines scattered among the asteroids poses a serious navigational hazard to this day.<p> | |||
<h2>Wrecks</h2> | |||
<h3>Liberty Heavy Fighter - F-3</h3> | |||
This Liberty heavy fighter was lost in combat against Rheinland forces during the Hudson War. Heavy damage and a missing transponder makes it impossible to tell who the pilot of this vessel was or when precisely they were lost.<p> | |||
<h3>Liberty Heavy Fighter - | |||
Contains: | Contains: | ||
<ul style="margin-top:- | <ul style="margin-top:-15px;"> | ||
<li>1x [[Lavablade Mk V]]</li> | <li>1x [[Lavablade Mk V]]</li> | ||
<li>1x [[Magma Hammer Turret]]</li> | <li>1x [[Magma Hammer Turret]]</li> | ||
| Line 137: | Line 141: | ||
<li>8x [[Nanobots]]</li> | <li>8x [[Nanobots]]</li> | ||
</ul> | </ul> | ||
<h3>Liberty Heavy Fighter - | <h3>Liberty Heavy Fighter - E-3</h3> | ||
This Liberty heavy fighter was lost in combat against Rheinland forces during the Hudson War. Heavy damage and a missing transponder makes it impossible to tell who the pilot of this vessel was or when precisely they were lost.<p> | |||
Contains: | Contains: | ||
<ul style="margin-top:- | <ul style="margin-top:-15px;"> | ||
<li>1x [[Lavablade Mk V]]</li> | <li>1x [[Lavablade Mk V]]</li> | ||
<li>1x [[Magma Hammer Turret]]</li> | <li>1x [[Magma Hammer Turret]]</li> | ||
| Line 148: | Line 152: | ||
<li>8x [[Nanobots]]</li> | <li>8x [[Nanobots]]</li> | ||
</ul> | </ul> | ||
<h3>Liberty Heavy Fighter - | <h3>Liberty Heavy Fighter - E/F-3</h3> | ||
This Liberty heavy fighter was lost in combat against Rheinland forces during the Hudson War. Heavy damage and a missing transponder makes it impossible to tell who the pilot of this vessel was or when precisely they were lost.<p> | |||
Contains: | Contains: | ||
<ul style="margin-top:- | <ul style="margin-top:-15px;"> | ||
<li>1x [[Lavablade Mk V]]</li> | <li>1x [[Lavablade Mk V]]</li> | ||
<li>1x [[Magma Hammer Turret]]</li> | <li>1x [[Magma Hammer Turret]]</li> | ||
| Line 159: | Line 163: | ||
<li>8x [[Nanobots]]</li> | <li>8x [[Nanobots]]</li> | ||
</ul> | </ul> | ||
<h3>Liberty Heavy Fighter - | <h3>Liberty Heavy Fighter - E-3</h3> | ||
This Liberty heavy fighter was lost in combat against Rheinland forces during the Hudson War. Heavy damage and a missing transponder makes it impossible to tell who the pilot of this vessel was or when precisely they were lost.<p> | |||
Contains: | Contains: | ||
<ul style="margin-top:- | <ul style="margin-top:-15px;"> | ||
<li>1x [[Lavablade Mk V]]</li> | <li>1x [[Lavablade Mk V]]</li> | ||
<li>1x [[Magma Hammer Turret]]</li> | <li>1x [[Magma Hammer Turret]]</li> | ||
| Line 170: | Line 174: | ||
<li>8x [[Nanobots]]</li> | <li>8x [[Nanobots]]</li> | ||
</ul> | </ul> | ||
<h3>Liberty Heavy Fighter - | <h3>Liberty Heavy Fighter - E-3</h3> | ||
This Liberty heavy fighter was lost in combat against Rheinland forces during the Hudson War. Heavy damage and a missing transponder makes it impossible to tell who the pilot of this vessel was or when precisely they were lost.<p> | |||
Contains: | Contains: | ||
<ul style="margin-top:- | <ul style="margin-top:-15px;"> | ||
<li>1x [[Lavablade Mk V]]</li> | <li>1x [[Lavablade Mk V]]</li> | ||
<li>1x [[Magma Hammer Turret]]</li> | <li>1x [[Magma Hammer Turret]]</li> | ||
| Line 182: | Line 186: | ||
</ul> | </ul> | ||
<h3>Liberty Heavy Fighter - F-3</h3> | <h3>Liberty Heavy Fighter - F-3</h3> | ||
This Liberty heavy fighter was lost in combat against Rheinland forces during the Hudson War. Heavy damage and a missing transponder makes it impossible to tell who the pilot of this vessel was or when precisely they were lost.<p> | |||
Contains: | Contains: | ||
<ul style="margin-top:- | <ul style="margin-top:-15px;"> | ||
<li>1x [[Lavablade Mk V]]</li> | <li>1x [[Lavablade Mk V]]</li> | ||
<li>1x [[Magma Hammer Turret]]</li> | <li>1x [[Magma Hammer Turret]]</li> | ||
| Line 193: | Line 197: | ||
</ul> | </ul> | ||
<h3>Rheinland Heavy Fighter - F-3</h3> | <h3>Rheinland Heavy Fighter - F-3</h3> | ||
Tasked to counter | Tasked to counter Liberty aggression during the Hudson War, this Rheinland fighter was one of thousands lost in battle. Heavy damage and a missing transponder makes it impossible to tell who the pilot of this vessel was or when precisely they were lost.<p> | ||
Contains: | Contains: | ||
<ul style="margin-top:- | <ul style="margin-top:-15px;"> | ||
<li>1x [[Stealthblade Mk II]]</li> | <li>1x [[Stealthblade Mk II]]</li> | ||
<li>1x [[Firekiss Mk II]]</li> | <li>1x [[Firekiss Mk II]]</li> | ||
| Line 206: | Line 210: | ||
</ul> | </ul> | ||
<h3>Rheinland Heavy Fighter - F-3/4</h3> | <h3>Rheinland Heavy Fighter - F-3/4</h3> | ||
Tasked to counter | Tasked to counter Liberty aggression during the Hudson War, this Rheinland fighter was one of thousands lost in battle. Heavy damage and a missing transponder makes it impossible to tell who the pilot of this vessel was or when precisely they were lost.<p> | ||
Contains: | Contains: | ||
<ul style="margin-top:- | <ul style="margin-top:-15px;"> | ||
<li>1x [[Stealthblade Mk II]]</li> | <li>1x [[Stealthblade Mk II]]</li> | ||
<li>1x [[Firekiss Mk II]]</li> | <li>1x [[Firekiss Mk II]]</li> | ||
| Line 219: | Line 223: | ||
</ul> | </ul> | ||
<h3>Liberty Heavy Fighter - F/G-3/4</h3> | <h3>Liberty Heavy Fighter - F/G-3/4</h3> | ||
This Liberty heavy fighter was lost in combat against Rheinland forces during the Hudson War. Heavy damage and a missing transponder makes it impossible to tell who the pilot of this vessel was or when precisely they were lost.<p> | |||
Contains: | Contains: | ||
<ul style="margin-top:- | <ul style="margin-top:-15px;"> | ||
<li>1x [[Lavablade Mk V]]</li> | |||
<li>1x [[Magma Hammer Turret]]</li> | |||
<li>8x [[Shield Battery]]</li> | |||
<li>8x [[Nanobots]]</li> | |||
</ul> | |||
<h3>Liberty Heavy Fighter - F-3</h3> | |||
This Liberty heavy fighter was lost in combat against Rheinland forces during the Hudson War. Heavy damage and a missing transponder makes it impossible to tell who the pilot of this vessel was or when precisely they were lost.<p> | |||
Contains: | |||
<ul style="margin-top:-15px;"> | |||
<li>1x [[Lavablade Mk V]]</li> | <li>1x [[Lavablade Mk V]]</li> | ||
<li>1x [[Magma Hammer Turret]]</li> | <li>1x [[Magma Hammer Turret]]</li> | ||
| Line 234: | Line 249: | ||
Contains: | Contains: | ||
<ul style="margin-top:- | <ul style="margin-top:-15px;"> | ||
<li>2x [[Adv. Tarantula]]</li> | <li>2x [[Adv. Tarantula]]</li> | ||
<li>5x [[Shield Battery]]</li> | <li>5x [[Shield Battery]]</li> | ||
| Line 240: | Line 255: | ||
</ul> | </ul> | ||
<h3>Liberty Heavy Fighter - G/F-4</h3> | <h3>Liberty Heavy Fighter - G/F-4</h3> | ||
This Liberty heavy fighter was lost in combat against Rheinland forces during the Hudson War. Heavy damage and a missing transponder makes it impossible to tell who the pilot of this vessel was or when precisely they were lost.<p> | |||
Contains: | Contains: | ||
<ul style="margin-top:- | <ul style="margin-top:-15px;"> | ||
<li>1x [[Lavablade Mk V]]</li> | <li>1x [[Lavablade Mk V]]</li> | ||
<li>1x [[Magma Hammer Turret]]</li> | <li>1x [[Magma Hammer Turret]]</li> | ||
| Line 250: | Line 265: | ||
<li>8x [[Nanobots]]</li> | <li>8x [[Nanobots]]</li> | ||
</ul> | </ul> | ||
<h3> | <h3>Separatist Fighter - F-5/4</h3> | ||
This Liberty Separatist heavy fighter was lost in combat against the Liberty Navy during the Scouring of Bering. Heavy damage and a missing transponder makes it impossible to tell who the pilot of this vessel was or when precisely they were lost.<p> | |||
Contains: | Contains: | ||
<ul style="margin-top:- | <ul style="margin-top:-15px;"> | ||
<li>1x [[Lavablade Mk V]]</li> | <li>1x [[Lavablade Mk V]]</li> | ||
<li>1x [[Magma Hammer Turret]]</li> | <li>1x [[Magma Hammer Turret]]</li> | ||
| Line 261: | Line 276: | ||
<li>8x [[Nanobots]]</li> | <li>8x [[Nanobots]]</li> | ||
</ul> | </ul> | ||
<h3> | <h3>Separatist Fighter - F-4</h3> | ||
This Liberty Separatist heavy fighter was lost in combat against the Liberty Navy during the Scouring of Bering. Heavy damage and a missing transponder makes it impossible to tell who the pilot of this vessel was or when precisely they were lost.<p> | |||
Contains: | Contains: | ||
<ul style="margin-top:- | <ul style="margin-top:-15px;"> | ||
<li>1x [[Lavablade Mk V]]</li> | <li>1x [[Lavablade Mk V]]</li> | ||
<li>1x [[Magma Hammer Turret]]</li> | <li>1x [[Magma Hammer Turret]]</li> | ||
| Line 272: | Line 287: | ||
<li>8x [[Nanobots]]</li> | <li>8x [[Nanobots]]</li> | ||
</ul> | </ul> | ||
<h3> | <h3>Separatist Fighter - G-5/4</h3> | ||
This Liberty Separatist heavy fighter was lost in combat against the Liberty Navy during the Scouring of Bering. Heavy damage and a missing transponder makes it impossible to tell who the pilot of this vessel was or when precisely they were lost.<p> | |||
Contains: | Contains: | ||
<ul style="margin-top:- | <ul style="margin-top:-15px;"> | ||
<li>1x [[Lavablade Mk V]]</li> | <li>1x [[Lavablade Mk V]]</li> | ||
<li>1x [[Magma Hammer Turret]]</li> | <li>1x [[Magma Hammer Turret]]</li> | ||
| Line 283: | Line 298: | ||
<li>8x [[Nanobots]]</li> | <li>8x [[Nanobots]]</li> | ||
</ul> | </ul> | ||
<h3> | <h3>Separatist Fighter - C-3</h3> | ||
This Liberty Separatist heavy fighter was lost in combat against the Liberty Navy during the Scouring of Bering. Heavy damage and a missing transponder makes it impossible to tell who the pilot of this vessel was or when precisely they were lost.<p> | |||
Contains: | Contains: | ||
<ul style="margin-top:- | <ul style="margin-top:-15px;"> | ||
<li>1x [[Lavablade Mk V]]</li> | <li>1x [[Lavablade Mk V]]</li> | ||
<li>1x [[Magma Hammer Turret]]</li> | <li>1x [[Magma Hammer Turret]]</li> | ||
| Line 295: | Line 310: | ||
</ul> | </ul> | ||
<h3>Rheinland Heavy Fighter - F/E-3</h3> | <h3>Rheinland Heavy Fighter - F/E-3</h3> | ||
Tasked to counter | Tasked to counter Liberty aggression during the Hudson War, this Rheinland fighter was one of thousands lost in battle. Heavy damage and a missing transponder makes it impossible to tell who the pilot of this vessel was or when precisely they were lost.<p> | ||
Contains: | Contains: | ||
<ul style="margin-top:- | <ul style="margin-top:-15px;"> | ||
<li>1x [[Stealthblade Mk II]]</li> | <li>1x [[Stealthblade Mk II]]</li> | ||
<li>1x [[Firekiss Mk II]]</li> | <li>1x [[Firekiss Mk II]]</li> | ||
| Line 308: | Line 323: | ||
</ul> | </ul> | ||
<h3>Rheinland Heavy Fighter - C-6/5</h3> | <h3>Rheinland Heavy Fighter - C-6/5</h3> | ||
Tasked to counter | Tasked to counter Liberty aggression during the Hudson War, this Rheinland fighter was one of thousands lost in battle. Heavy damage and a missing transponder makes it impossible to tell who the pilot of this vessel was or when precisely they were lost.<p> | ||
Contains: | Contains: | ||
<ul style="margin-top:- | <ul style="margin-top:-15px;"> | ||
<li>1x [[Stealthblade Mk II]]</li> | <li>1x [[Stealthblade Mk II]]</li> | ||
<li>1x [[Firekiss Mk II]]</li> | <li>1x [[Firekiss Mk II]]</li> | ||
| Line 321: | Line 336: | ||
</ul> | </ul> | ||
<h3>Rheinland Heavy Fighter - B-4/5</h3> | <h3>Rheinland Heavy Fighter - B-4/5</h3> | ||
Tasked to counter | Tasked to counter Liberty aggression during the Hudson War, this Rheinland fighter was one of thousands lost in battle. Heavy damage and a missing transponder makes it impossible to tell who the pilot of this vessel was or when precisely they were lost.<p> | ||
Contains: | Contains: | ||
<ul style="margin-top:- | <ul style="margin-top:-15px;"> | ||
<li>1x [[Stealthblade Mk II]]</li> | <li>1x [[Stealthblade Mk II]]</li> | ||
<li>1x [[Firekiss Mk II]]</li> | <li>1x [[Firekiss Mk II]]</li> | ||
| Line 338: | Line 353: | ||
<table class="wikitable sortable"> | <table class="wikitable sortable"> | ||
<tr> | <tr> | ||
<th>Target System</th> | <th style="background: rgba(255, 255, 255, 0.2)">Target System</th> | ||
<th>Type</th> | <th style="background: rgba(255, 255, 255, 0.2)">Type</th> | ||
<th>Location</th> | <th style="background: rgba(255, 255, 255, 0.2)">Location</th> | ||
</tr> | </tr> | ||
<tr> | <tr> | ||
| Line 351: | Line 366: | ||
<td>[[Jump Hole]]</td> | <td>[[Jump Hole]]</td> | ||
<td>[[B/C-6]]</td> | <td>[[B/C-6]]</td> | ||
</tr> | </tr> | ||
<tr> | <tr> | ||
| Line 379: | Line 384: | ||
</table> | </table> | ||
<i>NOTE: Page generated on the | <i>NOTE: Page generated on the 07/06/2024 at 15:55:45 UTC<i> | ||
[[Category: Systems]] | [[Category: Systems]] | ||
[[Category: Independent Worlds]] | [[Category: Independent Worlds]][[Category: NukeOnPatch]] | ||
Latest revision as of 15:59, 7 June 2024
| Bering | |
| System | |
| Governing House | Independent |
| Region | Independent Worlds |
| Connected Systems | Texas Hudson Hamburg |
No description available.
System Overview
|
Astronomical Bodies
Stellar Objects
Medium Yellow
Planetary Objects
Nebulae & Asteroids
|
Industrial Development
Space Stations
Commodity Mining
|
Faction Presence
Lawful Factions
Corporations & Guilds
Unlawful Factions
|
System Map
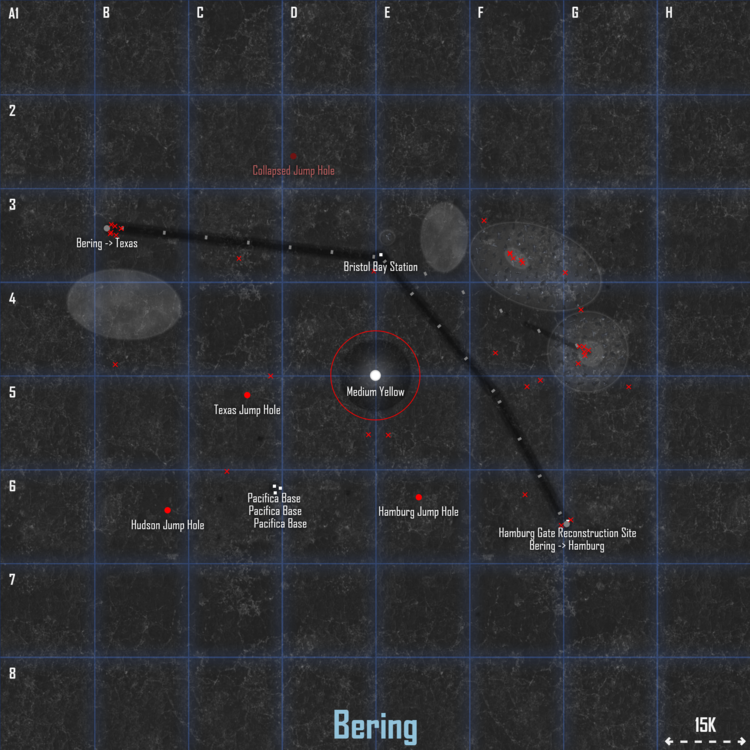
Areas of Interest
Nebulae
Asteroid Fields
Tanner Asteroid Belt
The Tanner Belt entirely engulfs the Bering system. Despite intensive surveys by both Liberty and Rheinland mining corporations, no mineral deposits of economic value have ever been discovered within the barren rock asteroids of the vast field. Unioners and Xenos have been spotted within the system on a regular basis.
Norton Debris Field
>>>WARNING: NAVIGATIONAL HAZARD<<<
The Norton Debris Field initially developed during the Hudson War as a result of battles fought between the Liberty Navy and Rheinland Military around the Hamburg Jump Gate. When the Jump Gate was sabotaged in 819 AS, several Liberty battlegroups were destroyed, greatly contributing to the wreckage. The Liberty Separatists later established their headquarters using the dangerous field as cover, although this did not save them from the Scouring of Bering in 827 AS. Since then, Bristol Construction and Manufacturing have begun salvaging the field, under a contract issued by the Liberty government.
Anadyr Debris Field
>>>WARNING: NAVIGATIONAL HAZARD<<<
The Anadyr Debris Field is the result of battles fought between the Liberty Navy and Rheinland Military during the Hudson War. Leaking reactor cores posed a severe challenge to salvage efforts, with works only recently being initiated by Bristol Construction and Manufacturing under a contract issued by the Liberty and Rheinland governments.
Pribilof Minefield
>>>WARNING: NAVIGATIONAL HAZARD<<<
This minefield was deployed by the Liberty Navy early in the Hudson War, in an attempt to secure one flank against the Rheinland Military's attacks on the Texas Jump Gate. The concealed mines scattered among the asteroids poses a serious navigational hazard to this day.
Nunivak Minefield
>>>WARNING: NAVIGATIONAL HAZARD<<<
This minefield was deployed by the Rheinland Military early in the Hudson War, in an attempt to ambush the numerically superior battlegroups of the Liberty Navy. The concealed mines scattered among the asteroids poses a serious navigational hazard to this day.
Wrecks
Liberty Heavy Fighter - F-3
This Liberty heavy fighter was lost in combat against Rheinland forces during the Hudson War. Heavy damage and a missing transponder makes it impossible to tell who the pilot of this vessel was or when precisely they were lost.
Contains:
- 1x Lavablade Mk V
- 1x Magma Hammer Turret
- 8x Shield Battery
- 8x Nanobots
Liberty Heavy Fighter - E-3
This Liberty heavy fighter was lost in combat against Rheinland forces during the Hudson War. Heavy damage and a missing transponder makes it impossible to tell who the pilot of this vessel was or when precisely they were lost.
Contains:
- 1x Lavablade Mk V
- 1x Magma Hammer Turret
- 8x Shield Battery
- 8x Nanobots
Liberty Heavy Fighter - E/F-3
This Liberty heavy fighter was lost in combat against Rheinland forces during the Hudson War. Heavy damage and a missing transponder makes it impossible to tell who the pilot of this vessel was or when precisely they were lost.
Contains:
- 1x Lavablade Mk V
- 1x Magma Hammer Turret
- 8x Shield Battery
- 8x Nanobots
Liberty Heavy Fighter - E-3
This Liberty heavy fighter was lost in combat against Rheinland forces during the Hudson War. Heavy damage and a missing transponder makes it impossible to tell who the pilot of this vessel was or when precisely they were lost.
Contains:
- 1x Lavablade Mk V
- 1x Magma Hammer Turret
- 8x Shield Battery
- 8x Nanobots
Liberty Heavy Fighter - F-3
This Liberty heavy fighter was lost in combat against Rheinland forces during the Hudson War. Heavy damage and a missing transponder makes it impossible to tell who the pilot of this vessel was or when precisely they were lost.
Contains:
- 1x Lavablade Mk V
- 1x Magma Hammer Turret
- 8x Shield Battery
- 8x Nanobots
Rheinland Heavy Fighter - F-3
Tasked to counter Liberty aggression during the Hudson War, this Rheinland fighter was one of thousands lost in battle. Heavy damage and a missing transponder makes it impossible to tell who the pilot of this vessel was or when precisely they were lost.
Contains:
- 1x Stealthblade Mk II
- 1x Firekiss Mk II
- 1x Countermeasure Dropper
- 10x Countermeasure Flare
- 9x Shield Battery
- 8x Nanobots
Rheinland Heavy Fighter - F-3/4
Tasked to counter Liberty aggression during the Hudson War, this Rheinland fighter was one of thousands lost in battle. Heavy damage and a missing transponder makes it impossible to tell who the pilot of this vessel was or when precisely they were lost.
Contains:
- 1x Stealthblade Mk II
- 1x Firekiss Mk II
- 1x Countermeasure Dropper
- 10x Countermeasure Flare
- 9x Shield Battery
- 8x Nanobots
Liberty Heavy Fighter - F/G-3/4
This Liberty heavy fighter was lost in combat against Rheinland forces during the Hudson War. Heavy damage and a missing transponder makes it impossible to tell who the pilot of this vessel was or when precisely they were lost.
Contains:
- 1x Lavablade Mk V
- 1x Magma Hammer Turret
- 8x Shield Battery
- 8x Nanobots
Liberty Heavy Fighter - F-3
This Liberty heavy fighter was lost in combat against Rheinland forces during the Hudson War. Heavy damage and a missing transponder makes it impossible to tell who the pilot of this vessel was or when precisely they were lost.
Contains:
- 1x Lavablade Mk V
- 1x Magma Hammer Turret
- 8x Shield Battery
- 8x Nanobots
Lonestar - F-6
Remnants of a Xeno fighter. It was probably destroyed by the Unioners, who have no use for Xeno weapons.
Contains:
- 2x Adv. Tarantula
- 5x Shield Battery
- 5x Nanobots
Liberty Heavy Fighter - G/F-4
This Liberty heavy fighter was lost in combat against Rheinland forces during the Hudson War. Heavy damage and a missing transponder makes it impossible to tell who the pilot of this vessel was or when precisely they were lost.
Contains:
- 1x Lavablade Mk V
- 1x Magma Hammer Turret
- 8x Shield Battery
- 8x Nanobots
Separatist Fighter - F-5/4
This Liberty Separatist heavy fighter was lost in combat against the Liberty Navy during the Scouring of Bering. Heavy damage and a missing transponder makes it impossible to tell who the pilot of this vessel was or when precisely they were lost.
Contains:
- 1x Lavablade Mk V
- 1x Magma Hammer Turret
- 8x Shield Battery
- 8x Nanobots
Separatist Fighter - F-4
This Liberty Separatist heavy fighter was lost in combat against the Liberty Navy during the Scouring of Bering. Heavy damage and a missing transponder makes it impossible to tell who the pilot of this vessel was or when precisely they were lost.
Contains:
- 1x Lavablade Mk V
- 1x Magma Hammer Turret
- 8x Shield Battery
- 8x Nanobots
Separatist Fighter - G-5/4
This Liberty Separatist heavy fighter was lost in combat against the Liberty Navy during the Scouring of Bering. Heavy damage and a missing transponder makes it impossible to tell who the pilot of this vessel was or when precisely they were lost.
Contains:
- 1x Lavablade Mk V
- 1x Magma Hammer Turret
- 8x Shield Battery
- 8x Nanobots
Separatist Fighter - C-3
This Liberty Separatist heavy fighter was lost in combat against the Liberty Navy during the Scouring of Bering. Heavy damage and a missing transponder makes it impossible to tell who the pilot of this vessel was or when precisely they were lost.
Contains:
- 1x Lavablade Mk V
- 1x Magma Hammer Turret
- 8x Shield Battery
- 8x Nanobots
Rheinland Heavy Fighter - F/E-3
Tasked to counter Liberty aggression during the Hudson War, this Rheinland fighter was one of thousands lost in battle. Heavy damage and a missing transponder makes it impossible to tell who the pilot of this vessel was or when precisely they were lost.
Contains:
- 1x Stealthblade Mk II
- 1x Firekiss Mk II
- 1x Countermeasure Dropper
- 10x Countermeasure Flare
- 9x Shield Battery
- 8x Nanobots
Rheinland Heavy Fighter - C-6/5
Tasked to counter Liberty aggression during the Hudson War, this Rheinland fighter was one of thousands lost in battle. Heavy damage and a missing transponder makes it impossible to tell who the pilot of this vessel was or when precisely they were lost.
Contains:
- 1x Stealthblade Mk II
- 1x Firekiss Mk II
- 1x Countermeasure Dropper
- 10x Countermeasure Flare
- 9x Shield Battery
- 8x Nanobots
Rheinland Heavy Fighter - B-4/5
Tasked to counter Liberty aggression during the Hudson War, this Rheinland fighter was one of thousands lost in battle. Heavy damage and a missing transponder makes it impossible to tell who the pilot of this vessel was or when precisely they were lost.
Contains:
- 1x Stealthblade Mk II
- 1x Firekiss Mk II
- 1x Countermeasure Dropper
- 10x Countermeasure Flare
- 9x Shield Battery
- 8x Nanobots
Jump Gates/Holes
| Target System | Type | Location |
|---|---|---|
| Texas | Jump Gate | B/A-3 |
| Hudson | Jump Hole | B/C-6 |
| Texas | Jump Hole | C-5 |
| Hamburg | Jump Hole | E-6 |
| Hamburg | Jump Gate | G/F-6 |
NOTE: Page generated on the 07/06/2024 at 15:55:45 UTC